
A New Pet Portrait in the Making: Behind the Scenes in the Studio
Introduction:
Hello, art lovers and pet enthusiasts! I’m thrilled to share that I’ve just started work on a new pet portrait in the studio this week. As always, I’m excited to dive into the creative process and bring another beloved furry friend to life on canvas. In this blog post, I’ll take you behind the scenes of my painting process, from the initial concept to the early stages of creation.
Step 1: Getting to Know the Subject
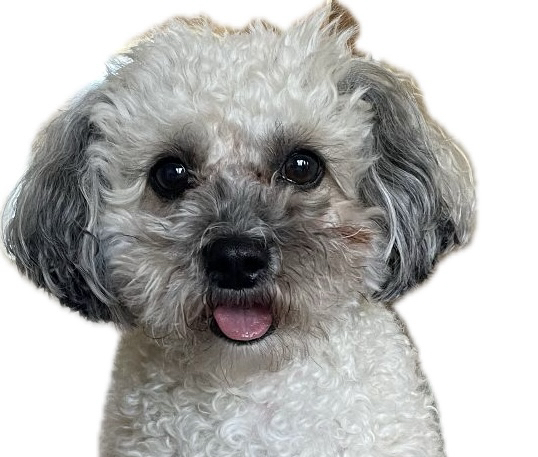
Every pet portrait begins with getting to know the subject. This week’s project features a charming little poodle named Hazel. Hazel’s owner provided me with several photos, and I had the pleasure of already knowing Hazel and her playful personality. Understanding these little details helps me capture the true essence of Hazel, ensuring the final portrait is not just a visual likeness but a reflection of her unique spirit.
Step 2: Selecting the Perfect Photo
Choosing the right reference photo is crucial. After reviewing the images, I selected one that showcases Hazel’s bright eyes and cheerful expression. This photo highlights her joyful character and provides a clear view of her distinctive features. It’s essential to have a high-quality image that captures the pet’s personality, as it serves as the foundation for the portrait.
Step 3: Initial Sketch
With the reference photo selected, I move on to the initial sketch. Using a pencil, I lightly outline Hazel’s form on the canvas, focusing on the proportions and key features. This step is all about capturing the basic structure and ensuring everything is correctly placed. It’s a delicate process that requires patience and precision, but it sets the stage for the detailed work to come.
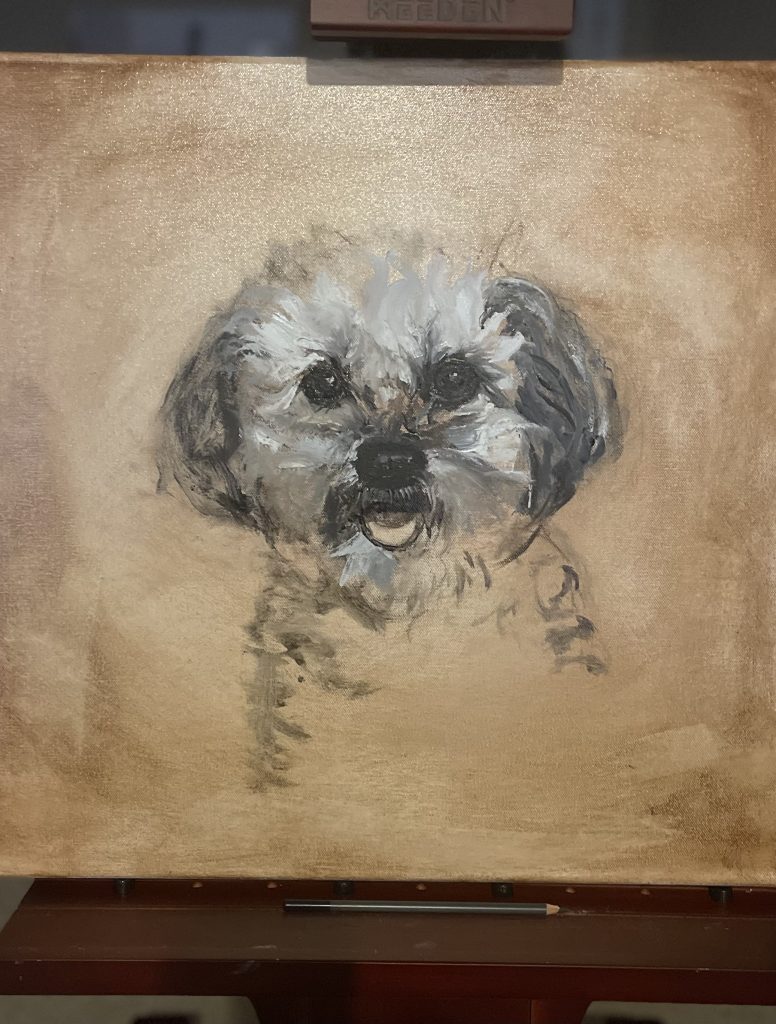
Step 4: Blocking in the Colors
Next, I begin blocking in the primary colors. I mix my oil paints to match Hazel’s grey and cream fur, starting with broad, loose strokes to cover the larger areas of the canvas. This stage is not about fine details but about establishing the overall color scheme and laying the groundwork for the texture and depth that will be added later. It’s always exciting to see the image start to take shape, even in these early stages.
Step 5: Adding Depth and Detail
As the base colors dry, I start adding layers to build depth and detail. This involves working on the nuances of Hazel’s fur, adding highlights and shadows to create a realistic, three-dimensional effect. I pay close attention to his eyes, as they are the windows to her soul, adding subtle reflections to bring them to life. This stage requires a lot of time and meticulous effort, but it’s incredibly rewarding to see Hazel’s personality emerge from the canvas.
Step 6: Fine-Tuning and Final Touches
The final stages involve fine-tuning the details and making any necessary adjustments. I step back frequently to view the painting from a distance, ensuring the overall composition is balanced and the likeness is accurate. The last touches often include refining the fur texture, enhancing the color vibrancy, and ensuring the eyes sparkle just right.
Conclusion:
I’m thrilled to be working on Hazel’s portrait this week and can’t wait to share the progress with you. Each pet portrait is a unique journey, and I’m honored to create a lasting tribute to these cherished companions. Stay tuned for updates as Hazel’s portrait comes to life on the canvas!
Get in Touch:
If you’re interested in commissioning a pet portrait or learning more about my process, please feel free to contact me. I’d love to hear about your furry friend and discuss how we can create a beautiful piece of art together.
Follow Me:
- Instagram: kendalllewisart
Leave a Reply